|
|
|
|
Shortcuts |
Creating a New TNTEdit Document
Open Microsoft WordÛ.
From the File menu choose New.
In the New dialog box double-click the TNTEdit icon.
The TNTEdit Document Information dialog box appears.
You should now have a new, empty document on the screen.
You can now type text into the document or prepare an author file to used with TNTEdit.
Create a new TNTEdit Document by clicking the New TNTEdit Document button
on the toolbar ![]() or by selecting File > New TNTEdit Document, or by pressing Ctrl + N.
or by selecting File > New TNTEdit Document, or by pressing Ctrl + N.
A new, empty document is created and the Document Information is transferred from the first document to the new document.
You can now type text into the document or prepare
an author file to used with TNTEdit.
Sometimes an author's manuscript may be contained in one large file. When preparing author files for keymarking you may want separate documents for front matter, chapters, tables, etc. Follow the steps below to break one file into multiple TNTEdit documents:
Create a new, empty TNTEdit document following method 1 or 2 above.
Follow the steps for preparing author files to insert the author file into the TNTEdit document
Select the text you want to move.
Click the New TNTEdit Document button on the toolbar ![]() or select File > New TNTEdit Document from the menu. The New TNTEdit Document dialog
opens:
or select File > New TNTEdit Document from the menu. The New TNTEdit Document dialog
opens:
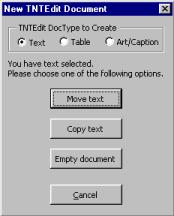
Choose the Document Type you want to create: a Text document for text, Table for sections containing tables, or Art/Caption for files containing artwork and corresponding captions.
Choose the Text Option.
![]() Move
text - moves the text from the original document to the new document
Move
text - moves the text from the original document to the new document
![]() Copy
text - leaves the text in the original document and copies the text to the new document
Copy
text - leaves the text in the original document and copies the text to the new document
![]() Empty
document - creates a new, empty TNTEdit document and leaves the selected text alone
Empty
document - creates a new, empty TNTEdit document and leaves the selected text alone
Save the file with the next sequence number, following the TNTEdit naming conventions.
Save the document with the next sequence number in the project, following the TNTEdit naming conventions.
At this point you can simply begin typing--using TNTEdit keymarks along the way if you wish--or you can prepare an existing file to be used with TNTEdit.
Author files come in many different formats. When preparing author files for use with TNTEdit the best results are achieved with files saved in Rich Text Format (.rtf). Many word and text processing packages, such as WordPerfectÛ, offer rtf as a "save as" option. If possible, request that authors save their files as rtf before sending them to editors. Other author file formats can also be successfully prepared for use with TNTEdit, provided you have the proper import filters installed with Microsoft WordÛ. Consult your Word help files and documentation for more information on installing and using import filters. Once the file is prepared, all of the TNTEdit functions are available for use within the document.
Once you have a new TNTEdit Document you are ready to begin preparing your file for use with TNTEdit.
From the Insert Menu choose File. The Insert File dialog box opens:
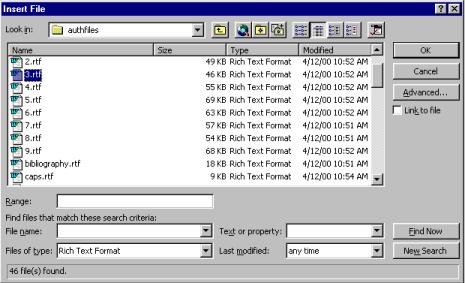
Select the type of file you want to import from the Files of type drop-down list. Rich Text Format files are recommended. If you do not have the rtf import filter installed you should install the filter by running the Word 97Û or Word 2000Û setup program again. See the documentation that came with your software or contact your system administrator for assistance with installing import filters.
Select the file you want to import by clicking on the file's icon.
Click the OK button to insert the file.
Your text should now be in the new TNTEdit document.
At this point it's a good idea to scan the document for any obvious problems or errors that may have happened after the file was inserted.
From the File menu, choose Save As.
Choose a file name and location to save the file. The file should be saved using TNTEdit Naming Conventions.
HTML files downloaded from the internet can be converted for use with the TNTEdit just like any other word processing file.
Using your web browser, navigate to the web page you want to download and edit.
From your browser's File menu select Save As (If you are using Internet ExplorerÛ version 5 or higher set the Save As Type to HTML only)
Save all the files you want to convert to TNTEdit.
Create a new TNTEdit Document (see above).
From the Insert Menu, select File
Set the Files of type: selector to All files (*.*)
Select the HTML file you want to insert and click Open
From the TNTEditorial menu, select Convert HTML. TNTEdit will ask if the document contains para marks at the end of every line (are there paragraph marks where line breaks occurred, not at the end of each paragraph).
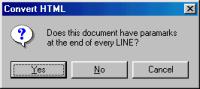
If there are, click Yes and TNTEdit will fix all of the line enders. Otherwise, press No. Press Cancel to abort the operation.
TNTEdit will clean up the document and insure any special characters are maintained.
You can now run AllMacsPrep and AllMacs.
 |